This article covers these topics:
- Introduction to sample fields
- Managing sample fields
- Using sample fields within projects
- List of Apple device types
Introduction to sample fields
Sample fields define useful information about the respondent. You can add custom sample fields as required. However, there are several available by default. All these fields can be used within the project, as conditions to control the route each respondent takes through the survey. Some sample fields are detected automatically from respondent's device; these are available by default, and some of them are not modifiable. See the table below for details.
The default sample fields are as follows:
| Sample Field | Description | Value | Modifiable |
|---|---|---|---|
| Username | The respondent's username. | a-z, A-Z, 0-9, -, _ and @ | No |
| Phone number | The respondent's telephone number, in international format. | +/0-9 | Yes |
| Valid email address of the respondent. | valid Email | Yes | |
| Rewards URL | You can specify a link to the respondent rewards online page. when specified, it will show among the side menu sections in the app. | valid and secure URL (HTTPS) | Yes, optional |
| Last entry | Time-stamp of last entry/activity made by the respondent. | Date Time | No |
| App language | Language that the respondent's app is set to. | language code (e.g. en for English, refer to supported languages) | No |
| Device type | Type of device used by the respondent. | mobile phone or tablet/iPad or Desktop/MAC PC or Apple device types. | No |
| Device OS | Name of the operating system used by the respondent's device. | Android/iOS | No |
| OS version | Version number of the operating system used by the respondent. | e.g. Android 4.0.2 | No |
| Lists | Name of the list the respondent belongs to. | a-z, A-Z, 0-9, -, _ and @ |
Yes |
| Status | Respondent status: indicates whether the respondent is logged in, logged out, or hasn't responded to the invitation yet. | Invited - Red Active - Green Logged out - Yellow |
No |
Managing sample fields
To manage sample list fields, when you have the list open click edit sample fields above the list. This presents a list of your custom fields you have created (on the left) and the system default sample fields (on the right). You can control the visibility of both the default sample fields and your custom fields, and you can add or remove custom fields as required.
You can click the eye icon to toggle each field's visibility on or off, this determines if the field is shown in the respondent list or not. The username field is always visible and cannot be hidden.
Adding sample fields
You can always add sample fields as needed. These are always modifiable, and exist only in your dashboard.
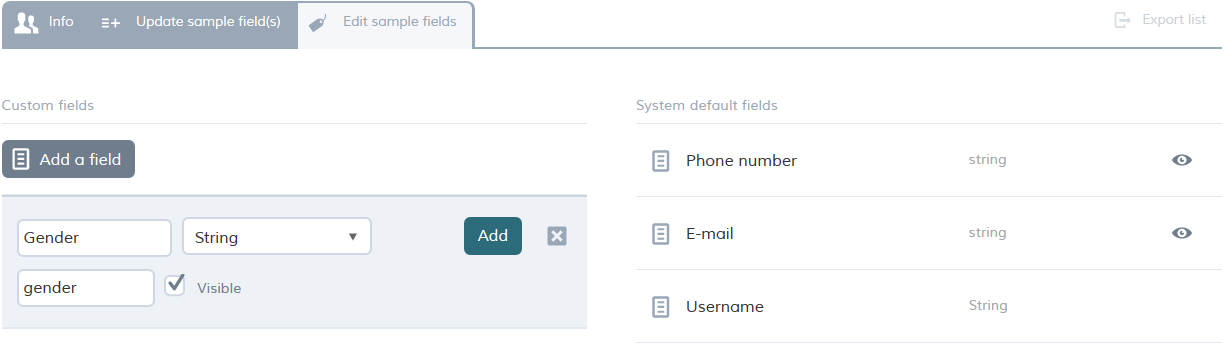
To add a sample field:
- Click add a field.
- In label, enter a name for the field.
- In the adjacent drop-down list, select the field type, according to the type of information you want the field to hold (number, string, date, time or date time).
- In alias, enter an alias (a label to be used to refer to the field in scripting and reports).
- To make the field visible to the project, and in reports, select visible.
- Click add.
Editing and deleting sample fields
In the list of custom fields, you can change the visibility of each, as well as the name, the type (number, string, date, time or date time). Click save changes to apply any edits you have made.
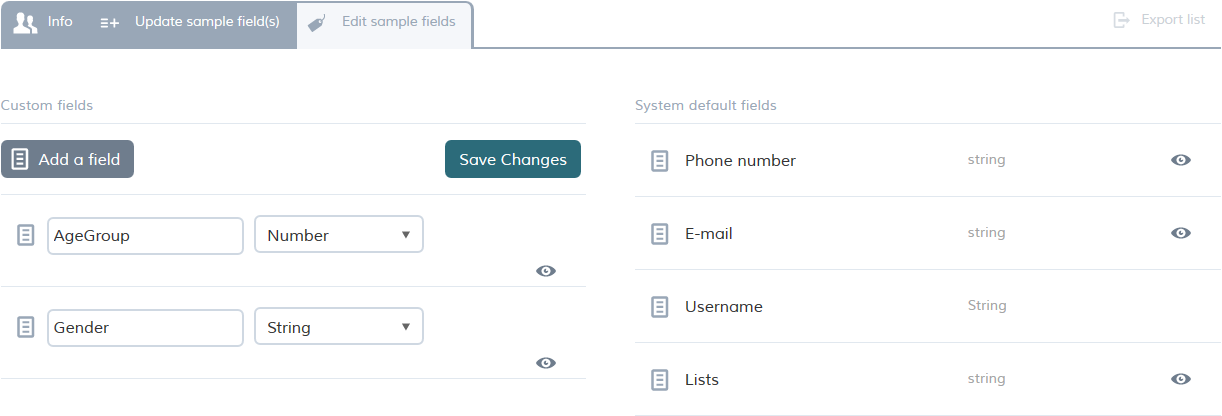
You can also delete a field you no longer need. In the list of fields, hold the mouse pointer over the field you want to delete, then click delete (the bin icon).
Adding and editing sample field values
Once you have added a sample field, you can add values for each respondent in order to use these values within your projects. There are two ways to achieve this:
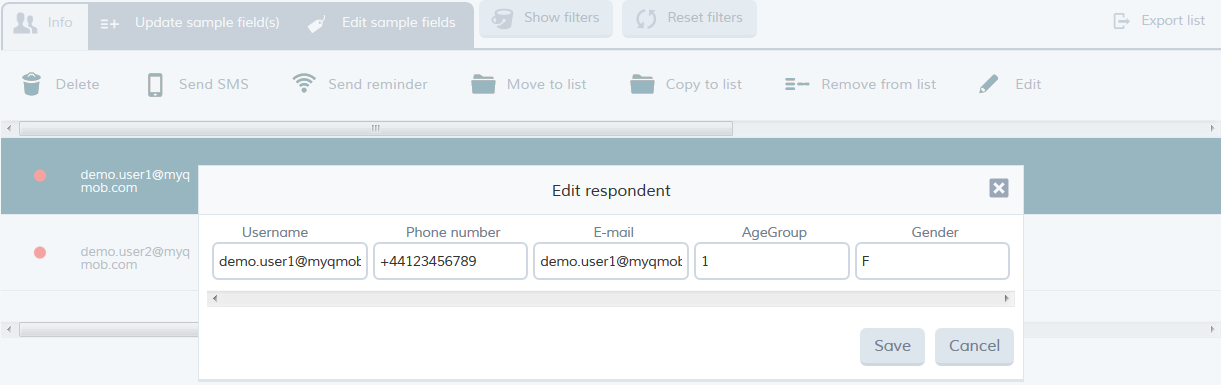
- Single add/edit: in the respondent list, click the respondent and select the action edit. You can then manually enter the field values for the respondent.
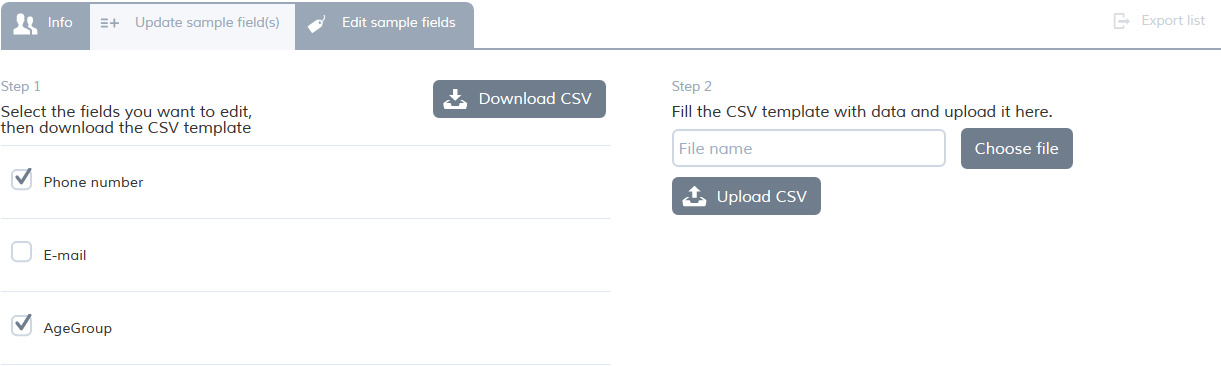
- Bulk import from a CSV file. Click update sample field(s), select the sample fields you want to update and then click download CSV. Enter the data into the CSV file and then import the file by clicking choose file, selecting the file, and then upload CSV.
Using Sample Fields within projects
If you have built a profile for your respondents and have sample fields that help you identify them, you may want to route the questionnaire accordingly. In this situation, you can use both default and custom sample fields within the routing logic of any of your projects.
Reading Sample Fields
The following function reads the value of the sample field. You can use this function as a condition in your script.
getrespdata(sample_field_alias)
For more information on how to use sample fields within a script please see Conditions
Apple device types
The device type field returns details of the device model used by the respondent. iOS devices return things like "iPhone4,1" (see the list below) while Android devices return a model name or number. The list of Apple devices is as follows:
| Model ID |
Device |
|---|---|
| iPhone1,1 |
iPhone (Original) |
| iPhone1,2 | iPhone 3G |
| iPhone2,1 | iPhone 3GS |
| iPhone3,1 | iPhone 4 (GSM) |
| iPhone3,2 | iPhone 4 |
| iPhone3,3 | iPhone 4 (CDMA) |
| iPhone4,1 | iPhone 4S |
| iPhone5,1 | iPhone 5 (GSM) |
| iPhone5,2 | iPhone 5 (CDMA) |
| iPhone5,3 | iPhone 5C (GSM) |
| iPhone5,4 | iPhone 5C (Global) |
| iPhone6,1 | iPhone 5S (GSM) |
| iPhone6,2 | iPhone 5S (Global) |
| iPhone7,2 | iPhone 6 |
| iPhone7,1 | iPhone 6 Plus |
| iPhone8,1 | iPhone 6s |
| iPhone8,2 | iPhone 6s Plus |
| iPhone8,4 | iPhone SE |
| iPhone9,1 | iPhone 7 |
| iPhone9,2 | iPhone 7 Plus |
| iPhone9,3 | iPhone 7 |
| iPhone9,4 | iPhone 7 Plus |
| iPhone10,1 | iPhone 8 |
| iPhone10,2 | iPhone 8 Plus |
| iPhone10,3 | iPhone X |
| iPhone10,4 | iPhone 8 |
| iPhone10,5 | iPhone 8 Plus |
| iPhone10,6 | iPhone X |
| iPhone11,2 | iPhone Xs |
| iPhone11,6 | iPhone Xs Max |
| iPhone12,1 | iPhone 11 |
| iPhone12,3 | iPhone 11 Pro |
| iPhone12,5 | iPhone 11 Pro Max |
| iPhone12,8 | iPhone SE (2020) |
| iPod1,1 | iPod Touch (1st generation) |
| iPod2,1 | iPod Touch (2nd generation) |
| iPod3,1 | iPod Touch (3rd generation) |
| iPod4,1 | iPod Touch (4th generation) |
| iPod5,1 | iPod Touch (5th generation) |
| iPad1,1 | iPad (Original) |
| iPad2,1 | iPad 2 (WiFi) |
| iPad2,2 | iPad 2 (GSM) |
| iPad2,3 | iPad 2 (CDMA) |
| iPad2,4 | iPad 2 (Early 2012) |
| iPad2,5 | iPad Mini (WiFi) |
| iPad2,6 | iPad Mini (4G) |
| iPad2,7 | iPad Mini (4G) |
| iPad3,1 | iPad (3rd generation) (WiFi) |
| iPad3,2 | iPad (3rd generation) (4G) |
| iPad3,3 | iPad (3rd generation) (4G) |
| iPad3,4 | iPad (4th generation) (WiFi) |
| iPad3,5 | iPad (4th generation) (4G) |
| iPad3,6 | iPad (4th generation) (4G) |
| iPad4,1 | iPad Air (WiFi) |
| iPad4,2 | iPad Air (4G) |
| iPad4,3 | iPad Air (4G) |
| iPad4,4 | iPad Mini 2 (WiFi) |
| iPad4,5 | iPad Mini 2 (4G) |
| iPad4,6 | iPad Mini 2 (4G) |
| iPad4,7 | iPad Mini 3 (WiFi) |
| iPad4,8 | iPad Mini 3 (4G) |
| iPad4,9 | iPad Mini 3 (4G) |
| iPad5,1 | iPad Mini 4 (WiFi) |
| iPad5,2 | iPad Mini 4 (4G) |
| iPad5,3 | iPad Air 2 (WiFi) |
| iPad5,4 | iPad Air 2 (4G) |
| iPad6,3 | iPad Pro 9.7" |
| iPad6,4 | iPad Pro 9.7" |
| iPad6,7 | iPad Pro 12.9" |
| iPad6,8 | iPad Pro 12.9" |
| iPad6,11 | iPad 9,7" 5th Gen |
| iPad6,12 | iPad 9,7" 5th Gen |
| iPad7,1 | iPad Pro 12.9" |
| iPad7,2 | iPad Pro 12.9" |
| iPad7,3 | iPad Pro 10.5" |
| iPad7,4 | iPad Pro 10.5" |
| iPad7,5 | iPad 9.7" 6th Gen |
| iPad7,6 | iPad 9.7" 6th Gen |
| iPad7,11 | iPad 10.2 7th Gen |
| iPad7,12 | iPad 10.2 7th Gen |
| iPad8,1 | iPad Pro 11" |
| iPad8,2 | iPad Pro 11" |
| iPad8,3 | iPad Pro 11" |
| iPad8,4 | iPad Pro 11" |
| iPad8,5 | iPad Pro 12.9" |
| iPad8,6 | iPad Pro 12.9" |
| iPad8,7 | iPad Pro 12.9" |
| iPad8,8 | iPad Pro 12.9" |
| iPad8,9 | iPad Pro 11" |
| iPad8,10 | iPad Pro 11" |
| iPad8,11 | iPad Pro 12.9" |
| iPad8,12 | iPad Pro 12.9" |
| iPad11,1 | iPad Mini 5th Gen |
| iPad11,2 | iPad Mini 5th Gen |
| iPad11,3 | iPad Air 3rd Gen |
| iPad11,4 | iPad Air 3rd Gen |
| i386 | iPhone Simulator |
| x86_64 | iPhone Simulator |